相关接口和 SDK for Web 版本相同:
Github 地址:
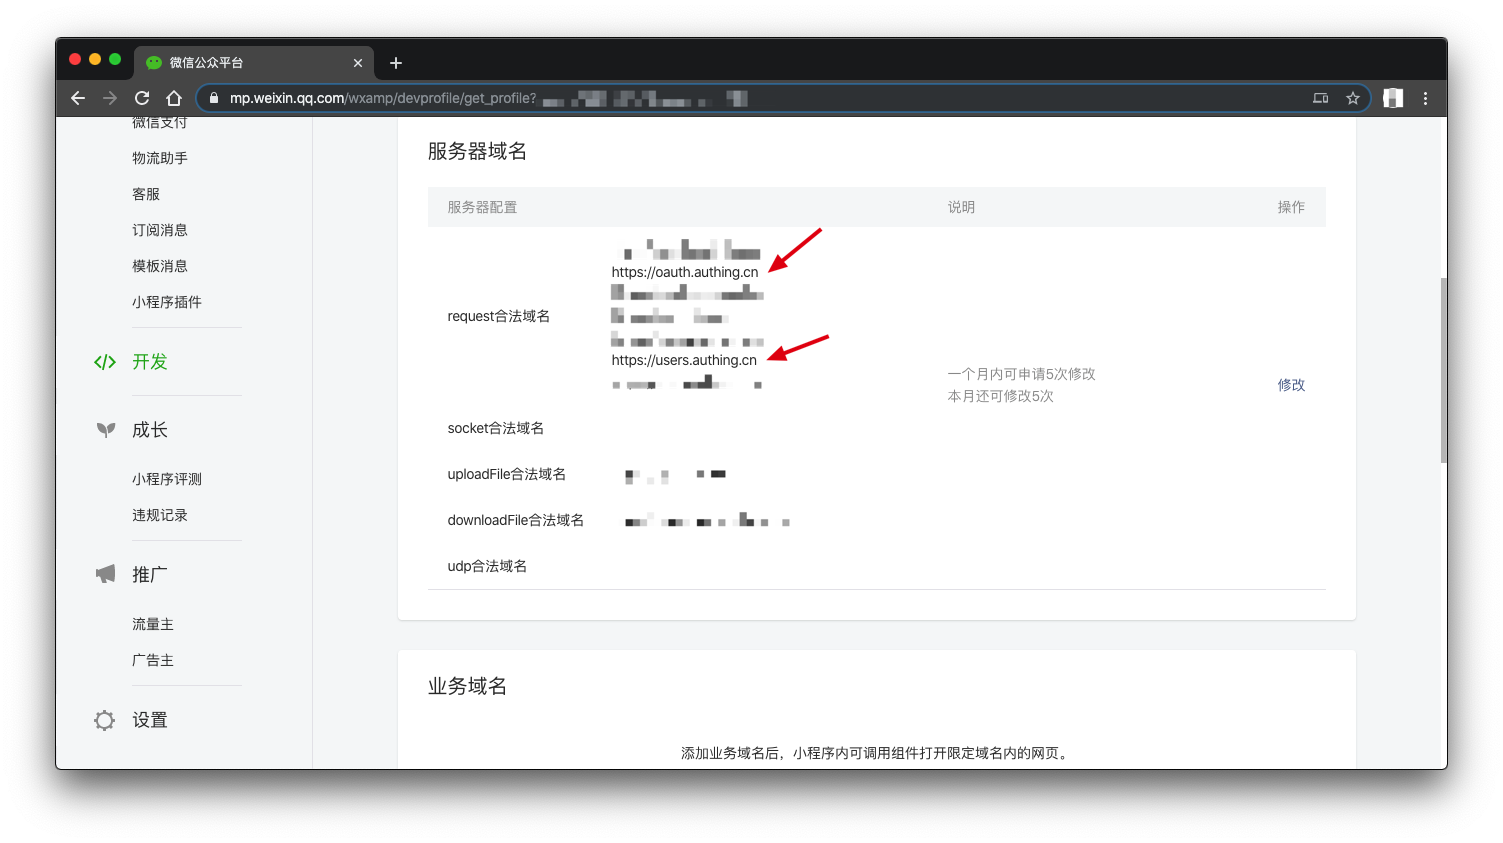
NOTE! 在小程序中开发需要在小程序管理后台中配置域名,两个域名分别为:https://users.authing.cn
和https://oauth.authing.cn
准备工作
注册微信小程序开发账号
将 oauth.authing,cn
和 users.authing.cn
加入微信的服务器列表
在 Authing 控制台开启微信小程序社会化登录
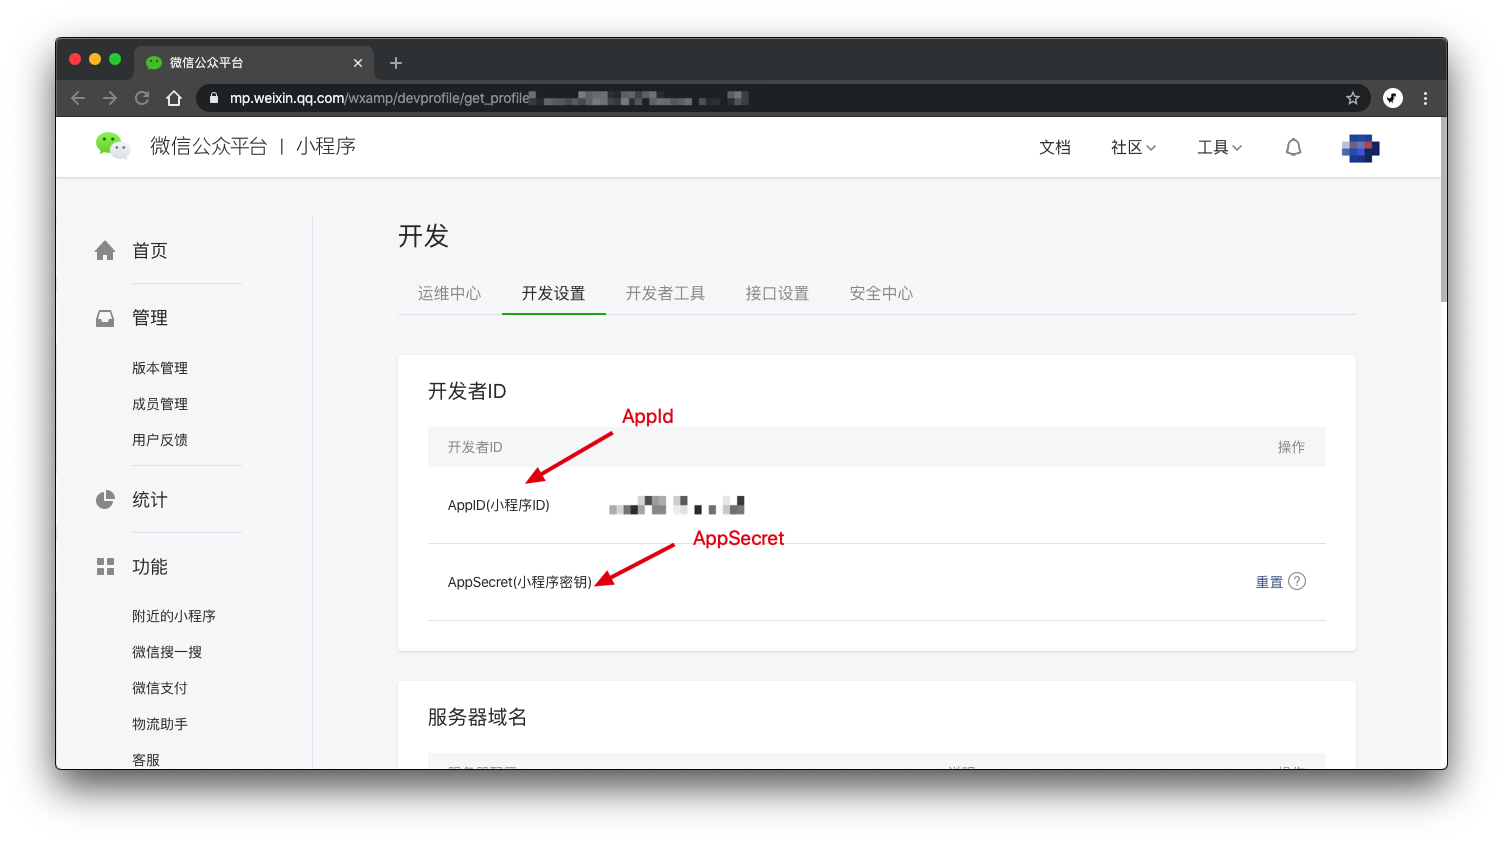
获取微信小程序 AppId 和 AppSecret
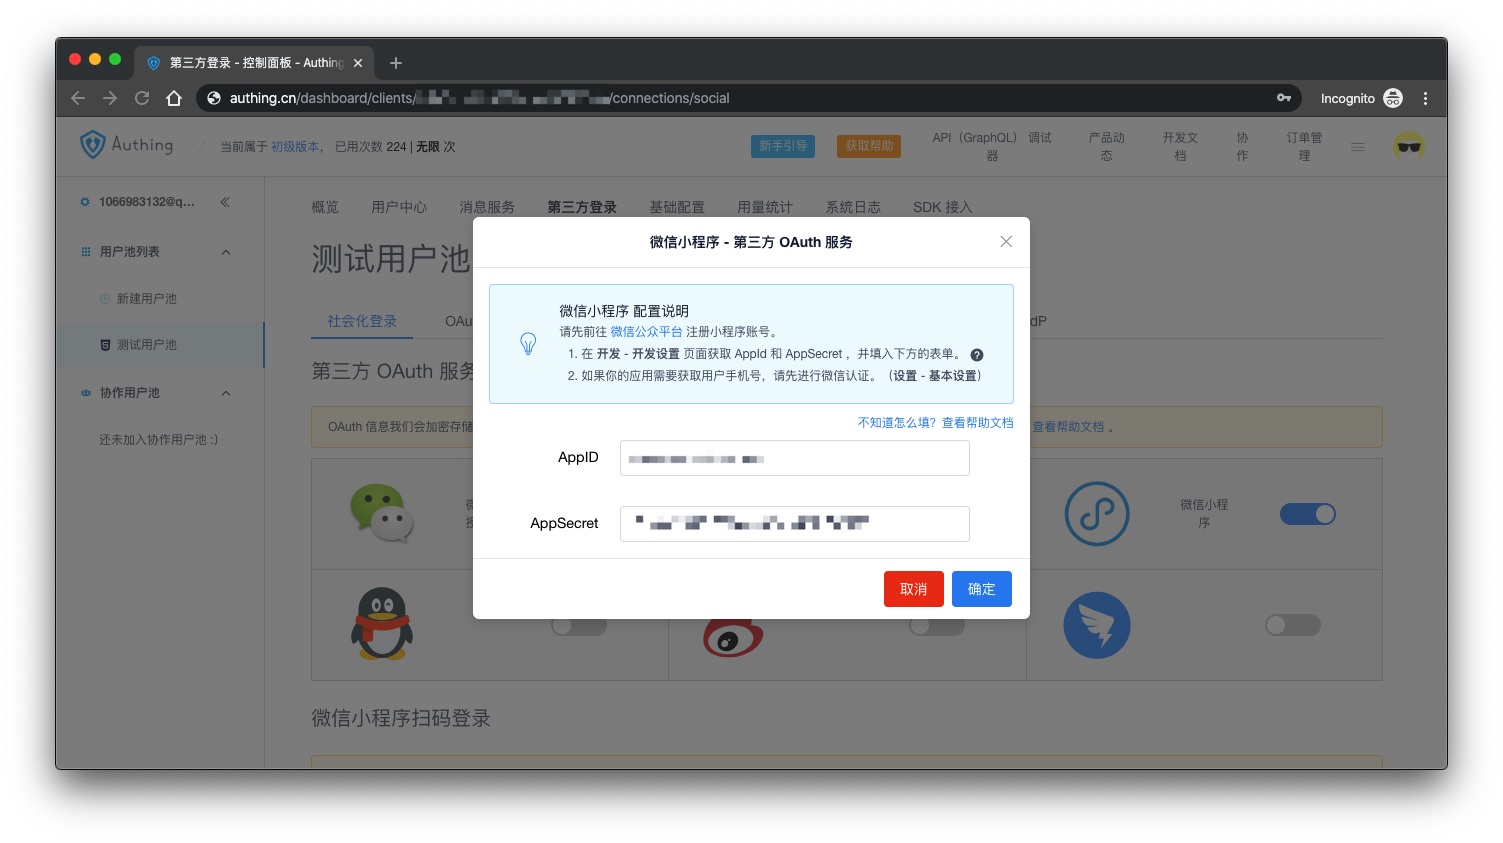
前往 Authing 控制台 第三方登录 -> 社会化登录 -> 第三方OAuth
填入微信小程序的 AppId 和 AppSecret
开始接入
下载代码
git clone https://github.com/Authing/authing-wxapp-sdk
引入文件
然后将 repo 内的 authing 文件夹移动到你的项目目录下,之后使用 require 引入
var Authing = require('path/to/authing/authing.js')
初始化
如果你对 Authing 用户池这个概念不是很了解,可以查阅 Authing 官方文档:
const authing = new Authing({
userPoolId: 'YOUR_USERPOOLID'
});
之后就可以调用其他的方法了,比如:
authing.login({
email: "USER_EMAIL",
password: "USER_PASSWORD"
}).then(userinfo => {
this.setData({
userinfo: userinfo,
})
}).catch(err => {
this.showDialog("登录失败!", err.message)
})
获取小程序的 Code
Code 用来在小程序中执行微信登录,获取用户信息。wx.login
方法用于获取 code
,此方法不需要经过用于授权。
下面推荐一种如何处理 Code 的最佳实践:
app 初次启动的时候判断登录态,如未登录,调用 wx.login()
获取 code
并存入 stroage
。
// app.js
onLaunch: function() {
console.log('App Launch')
// 最佳实践,初次 launch 的时候获取 code 并保存到 localStorage 中
wx.checkSession({
success(res) {
console.log(res)
},
fail() {
wx.login({
success(res) {
const code = res.code;
wx.setStorageSync("code", code)
}
})
}
})
},
每次页面 onLoad
时判断登录态,如果登录失效,重新登录获取 code
并替换原来存在 stroage
中的 code
:
onLoad: function() {
const self = this
wx.checkSession({
// 若丢失了登录态,通过 wx.login 重新获取
fail() {
wx.login({
succes(res) {
const code = res.code;
wx.setStorageSync("code", code)
}
})
}
})
},
之后调用 Authing SDK 微信相关接口的时候,使用下面的方法获取 token
,这样就能确保此 token
是最新的。
const code = wx.getStorageSync("code")
使用微信授权登录
注:当前小程序版本,第一次获取用户信息需要用户主动点击开放组件。授权通过之后,后续可以直接调用接口。
Authing 对微信授权协议进行了封装,使得开发者可以用几行代码实现使用微信身份登录。开发者只需要引导用户点击微信开放 button 组件,获取到点击事件 e
之后,将 e.detail
传给 authing.loginWithWxapp
方法即可。
同时,你也可以传入手机号(获取方法见下文),这样如果用户之前使用手机号注册过,登录获取到的将会是同一个用户。
参数:
options
detail: 用户头像授权事件 e.detail,必填。
overideProfile: 如果用户之前使用手机号注册过,是否替换调用户的头像和昵称,默认为 false。
<!-- example.wxml -->
<button open-type="getUserInfo" lang="zh_CN" bindgetuserinfo="onGotUserInfo">获取微信头像</button>
// example.js
onGotUserInfo: function(e) {
const self = this;
// 微信 wx.login 返回的 code, 为了提高灵活性,开发者需要自己维护。
// 调用 authing.loginWithWxapp()、authing.bindPhone() 的时候请确保 code 是可用的。
const code = wx.getStorageSync("code")
// 获取到的用户手机号,获取方法见下文
const phone = this.data.phone.phoneNumber
authing.loginWithWxapp({
code,
detail: e.detail,
phone,
overideProfile: ture,
}).then(userinfo => {
console.log(userinfo)
self.setData({
userinfo: userinfo,
})
wx.login({
success(res) {
const code = res.code;
wx.setStorageSync("code", code)
}
})
}).catch(err => {
self.showDialog("操作失败", err)
})
},
若用户之前同意过授权,不需要点击 button
就能直接获取,示例:
const self = this;
// 查看是否授权
wx.getSetting({
success(res) {
if (res.authSetting['scope.userInfo']) {
// 已经授权,可以直接调用 getUserInfo 获取头像昵称
wx.getUserInfo({
success: function(res) {
authing.loginWithWxapp({
code,
detail: res
}).then(userinfo => {
console.log(userinfo)
self.setData({
userinfo: userinfo,
})
}).catch(err => {
self.showDialog("操作失败", err)
})
}
})
}
}
})
注⚠️:在获取用户信息之后,code 将会失效,所以这里调用了 wx.login
刷新 code
并保持至 localStorage
。
获取手机号
此接口需小程序通过 微信认证。
注:获取手机号需要使用微信开放组件,不能直接调用微信开放接口。示例如下:
<button open-type="getPhoneNumber" bindgetphonenumber="getPhone">获取手机号</button>
Authing 对微信授权协议进行了封装,使得开发者可以用几行代码实现获取用户手机号。开发者只需要引导用户点击微信开放 button 组件,获取到点击事件 e
之后,将 e.detail
传给 authing.getPhone
方法即可。
参数:
options
detail: 手机号授权事件 e.detail,必填。
getPhone: function(e) {
const code = wx.getStorageSync("code")
authing.getPhone({code, detail: e.detail}).then(phone => {
console.log(phone)
this.setData({
phone
})
wx.login({
success(res) {
const code = res.code;
wx.setStorageSync("code", code)
}
})
})
},
回调参数 phone 示例如下:
{
"phoneNumber": "1767xxxx6754",
"purePhoneNumber": "176xxxx6754",
"countryCode": "86"
}
注⚠️:在获取手机号之后,code 将会失效,所以这里调用了 wx.login
刷新 code
并保持至 localStorage
。
绑定手机号
此接口需小程序通过 微信认证。
开发者可以使用此接口让用户绑定手机号,但是不能用于通过手机号登录或注册新用户,如果想通过手机验证码登录,需要调用 loginByPhoneCode 方法。
每次获取微信用户的手机号必须用户主动点击开放组件 button,且无主动调用 API。
Authing 对换取用户手机号的协议进行了封装,开发者只需要引导用户点击微信开放 button 组件,获取到点击事件 e 之后,将 e.detail 传给 authing.bindPhone 方法即可。示例:
参数:
options
detail: 手机号授权事件 e.detail,必填。
<button open-type="getPhoneNumber" bindgetphonenumber="bindPhone">绑定手机号</button>
// example.js
bindPhone: function(e) {
const self = this
console.log(e)
// 请确保这个 code 是最新可用的
const code = wx.getStorageSync("code")
authing.bindPhone({code, detail: e.detail}).then(function(userinfo) {
console.log(userinfo)
self.setData({
userinfo: userinfo,
})
wx.login({
success(res) {
const code = res.code;
wx.setStorageSync("code", code)
}
})
}).catch(function(err) {
self.showDialog("操作失败", err.message)
})
},
注⚠️:在获取用户手机号之后,code 将会失效,所以这里调用了 wx.login
刷新 code
并保持至 localStorage
。
修改头像
Authing 会自动处理打开相册、上传图片的逻辑,开发者只需要传入唯一的参数:userId
即可,成功的回调函数会返回最新的用户信息。
// 需在登录状态下调用
changeAvatar: function() {
const self = this;
const userId = this.data.userinfo._id
authing.changeAvatar(userId).then(function(userinfo) {
console.log(userinfo)
self.setData({
userinfo: userinfo,
})
}).catch(function(err) {
console.log(err)
})
},
用户自定义字段
用户自定义 Metadata 是除了 Authing 基础用户字段之外,开发者可以给用户添加的额外字段,属于 Authing 扩展能力的一部分。
Metadata 是一组 key-value 值,开发者可以通过设置自定义字段,存储少量业务相关的数据。
详细的接口请见: 用户自定义字段 。
调用示例:
const userId = this.data.userinfo._id
authing.metadata(userId).then(async metadata => {
console.log("初始用户自定义字段为空:", metadata)
await authing.setMetadata({
_id: userId,
key: "KEY",
value: "VALUE"
})
metadata = await authing.metadata(userId)
console.log("setMetadata 之后的用户自定义字段:", metadata)
await authing.removeMetadata({
_id: userId,
key: "KEY"
})
metadata = await authing.metadata(userId)
console.log("removeMetadata 之后的用户自定义字段:", metadata)
})
其他接口
其他和 JavaScript 版本相同:https://github.com/Authing/authing-js-sdk,若存在问题,可以发 issue 指出。
完成接入
恭喜你,此时已经接入了微信小程序登录。获取到用户信息之后,你可以得到登录凭证 token,你可以在后续的 API 请求中携带上此 token, 然后在后端接口中根据此 token 区分不同用户,详情请见验证 token。
Get Help
Join us on Gitter: #authing-chat